

BLE Beacon Tutorial (Bluetooth Low Energy): A Complete Guide for Beginners

Bluetooth Low Energy (BLE) beacons have become a cornerstone technology in the world of proximity marketing, indoor navigation, asset tracking, and smart environments. Their ability to broadcast small packets of data over short distances with minimal power consumption makes them ideal for a wide range of applications. This tutorial will guide you through the fundamentals of BLE beacons, how they work, how to set one up, and practical use cases to help you get started.
What is a BLE Beacon?
A BLE beacon is a small wireless device that continuously transmits Bluetooth Low Energy signals. These signals contain unique identifiers or data packets that nearby BLE-enabled devices (like smartphones or tablets) can detect and interpret.
Unlike traditional Bluetooth, BLE is designed for low power consumption, allowing beacons to operate for months or even years on a small battery.
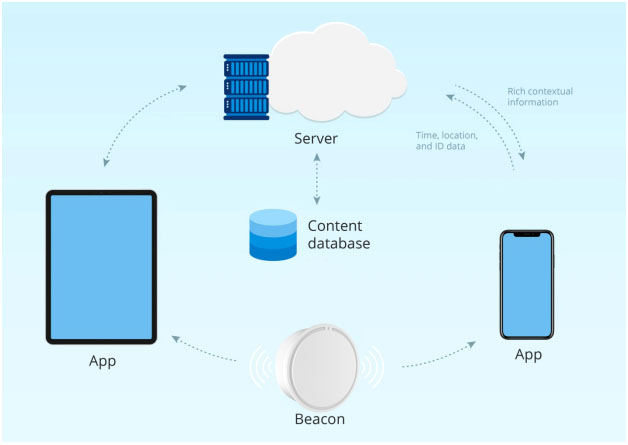
How Does a BLE Beacon Work?
BLE beacons operate by broadcasting advertising packets at regular intervals. These packets typically include:
-
UUID (Universally Unique Identifier): A unique code identifying the beacon or the organization.
-
Major and Minor values: Used to differentiate individual beacons within a group.
-
Tx Power: The signal strength at 1 meter, used to estimate distance.
When a BLE-enabled device detects these packets, it can trigger actions such as notifications, location-based services, or data logging.
Common BLE Beacon Protocols
Several beacon protocols exist, each with specific features:
1. iBeacon (Apple)
-
Proprietary protocol by Apple.
-
Uses UUID, Major, and Minor identifiers.
-
Widely supported on iOS and Android devices.
2. Eddystone (Google)
-
Open-source protocol.
-
Supports multiple frame types: UID, URL, TLM (telemetry), and EID (ephemeral ID).
-
Enables direct URL broadcasting for physical web applications.
3. AltBeacon
-
Open protocol developed by Radius Networks.
-
Designed for interoperability and flexibility.
Components Needed to Set Up a BLE Beacon
To create and test your own BLE beacon, you will need:
-
BLE Beacon Hardware: Commercial beacons or development boards like Nordic nRF52, ESP32, or Raspberry Pi with BLE support.
-
Beacon Configuration App: Apps like “BeaconSET” or “nRF Connect” to configure beacon parameters.
-
Smartphone or BLE Scanner: To detect and interact with the beacon signals.
-
Development Environment (Optional): For custom beacon firmware or app development (e.g., Arduino IDE, Nordic SDK).
Step-by-Step BLE Beacon Setup Tutorial
Step 1: Choose Your Hardware
For beginners, a ready-made BLE beacon device is easiest. For developers, a microcontroller like the ESP32 or Nordic nRF52840 offers flexibility.
Step 2: Power On and Reset the Beacon
Insert batteries or connect power. Reset the device if necessary to start broadcasting default signals.
Step 3: Install a Beacon Configuration App
Download apps such as:
-
BeaconSET (iOS/Android)
-
nRF Connect (Android/iOS)
-
LightBlue Explorer (iOS)
These apps allow you to scan for nearby beacons and configure their broadcast data.
Step 4: Scan for Your Beacon
Open the app and scan for BLE devices. Your beacon should appear with a default name or UUID.
Step 5: Configure Beacon Parameters
Using the app, set:
-
UUID: Unique identifier for your project or organization.
-
Major and Minor: To identify specific locations or items.
-
Tx Power: Adjust signal strength for desired range.
-
Advertising Interval: Frequency of broadcast (e.g., 100ms to 1s).
Save and apply the settings.
Step 6: Test Beacon Detection
Use your smartphone or BLE scanner to detect the beacon. Verify that the UUID, Major, Minor, and signal strength are as expected.
Developing a Custom BLE Beacon with ESP32
For those interested in custom firmware, the ESP32 microcontroller is a popular choice.
Requirements
-
ESP32 development board
-
Arduino IDE with ESP32 board support installed
-
USB cable for programming
Sample Code to Broadcast iBeacon
#include <BLEDevice.h>
#include <BLEUtils.h>
#include <BLEBeacon.h>
#include <BLEAdvertising.h>
BLEBeacon beacon;
void setup() {
Serial.begin(115200);
BLEDevice::init("ESP32_Beacon");
beacon.setManufacturerId(0x004C); // Apple
beacon.setProximityUUID(BLEUUID("12345678-1234-1234-1234-123456789abc"));
beacon.setMajor(1);
beacon.setMinor(1);
beacon.setSignalPower(-59);
BLEAdvertising *pAdvertising = BLEDevice::getAdvertising();
pAdvertising->setAdvertisementData(beacon.getAdvertisementData());
pAdvertising->setScanResponseData(beacon.getScanResponseData());
pAdvertising->start();
Serial.println("iBeacon started...");
}
void loop() {
// Nothing to do here
}
Upload this code to your ESP32, and it will start broadcasting as an iBeacon.
Practical Applications of BLE Beacons
1. Indoor Navigation
Beacons placed throughout a building can help users navigate malls, airports, or museums via smartphone apps.
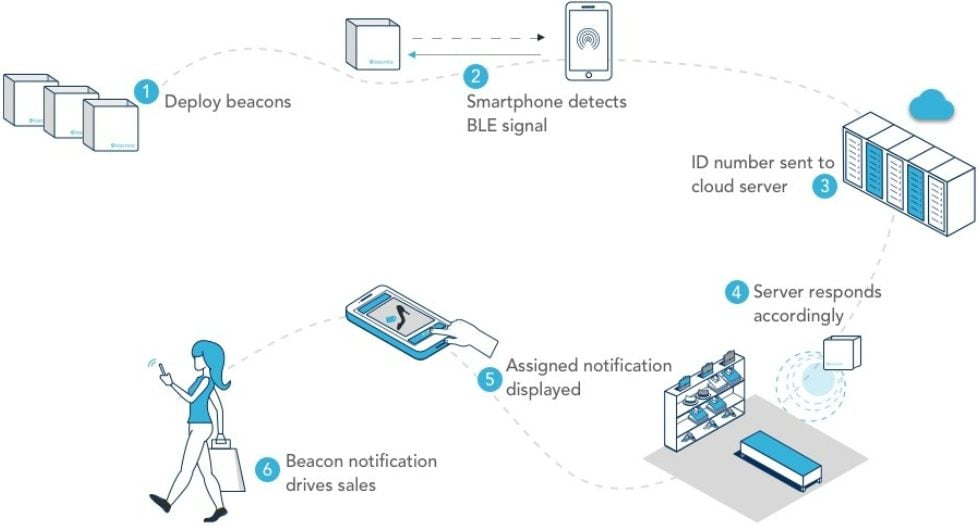
2. Proximity Marketing
Retailers use beacons to send targeted offers and product information to customers’ phones when they enter specific zones.
3. Asset Tracking
Companies track equipment or inventory by attaching beacons and monitoring their location in real-time.
4. Attendance and Access Control
Beacons can automate attendance logging or control access to restricted areas.
5. Smart Homes and Automation
Beacons trigger smart home devices based on user proximity, enhancing convenience and energy efficiency.
Tips for Optimizing BLE Beacon Performance
-
Placement: Position beacons to minimize interference from walls and metal objects.
-
Power Settings: Adjust Tx power and advertising intervals to balance range and battery life.
-
Battery Life: Use low advertising frequency for longer battery life; replace batteries regularly.
-
Security: Use encrypted beacon protocols or rotate identifiers to prevent spoofing.
-
Testing: Regularly scan and verify beacon signals to ensure consistent performance.
Troubleshooting Common Issues
|
Issue |
Possible Cause |
Solution |
|
Beacon not detected |
Out of range or dead battery |
Move closer or replace battery |
|
Signal interference |
Metal objects or Wi-Fi devices |
Reposition beacon |
|
Incorrect UUID shown |
Configuration error |
Reconfigure beacon settings |
|
Short battery life |
High advertising frequency |
Increase advertising interval |
|
App not recognizing beacon |
Unsupported protocol |
Use compatible app or update firmware |
Conclusion
BLE beacons are powerful tools for creating context-aware applications that enhance user experiences and operational efficiency. Whether you’re a hobbyist experimenting with ESP32 or a business deploying large-scale beacon networks, understanding the basics of BLE beacon technology and setup is essential.
This tutorial has covered the fundamentals, hardware options, configuration steps, and practical applications to get you started with BLE beacons. With the right setup and optimization, you can unlock a world of possibilities in proximity sensing and location-based services.
Frequently Asked Questions
1. How far can a BLE beacon signal reach?
Typical BLE beacon range is 30-50 meters indoors and up to 100 meters outdoors, depending on power settings and environment.
2. Can I use my smartphone as a BLE beacon?
Yes, some smartphones support beacon broadcasting via apps, but dedicated hardware offers better range and battery life.
3. How long do BLE beacon batteries last?
Battery life varies from months to years based on advertising interval and power settings; typical coin cell batteries last 1-2 years.
4. Are BLE beacons secure?
Basic beacons broadcast unencrypted data, but advanced protocols and rotating IDs improve security against spoofing.
5. Can BLE beacons work with both iOS and Android devices?
Yes, most beacons support both platforms, but some protocols like iBeacon are optimized for iOS, while Eddystone is more Android-friendly.