

SATA SSD Installation Guide: Upgrade Your Storage in a Snap

Upgrading your computer’s storage can feel intimidating, but with the right guide, it’s a task you can confidently accomplish in under an hour. If you’ve been dealing with a slow hard drive, installing a SATA SSD (Solid State Drive) is one of the best ways to breathe new life into your system. With faster boot times, quicker file transfers, and a snappier overall experience, this is an upgrade you’ll wish you’d done sooner.
In this step-by-step SATA SSD installation guide, we’ll walk you through the process of installing your new drive, whether on a desktop or laptop, and show you how to maximize its performance.
Why Upgrade to a SATA SSD?
Before diving into the installation process, let’s quickly cover why SATA SSDs are a game-changer.
-
Speed: SATA SSDs are significantly faster than traditional HDDs. While a typical HDD offers speeds around 100 MB/s, SATA SSDs can deliver up to 550 MB/s.
-
Reliability: SSDs have no moving parts, making them more durable and less prone to mechanical failure compared to HDDs.
-
Energy Efficiency: They consume less power, which means longer battery life for laptops.
-
Silent Operation: SSDs run without the noise or vibrations associated with HDDs.
Whether you’re upgrading for better gaming performance, faster boot times, or smoother multitasking, a SATA SSD is a solid choice for most users.
What You’ll Need for the Installation
Before starting, gather the following tools and materials to ensure a smooth process:
-
A SATA SSD of your choice
-
A screwdriver (usually Phillips-head)
-
SATA cable (for desktops)
-
Cloning software (if you’re migrating data)
-
External enclosure or USB-to-SATA adapter (optional, for data transfer)
Step-by-Step Guide to Installing a SATA SSD
Step 1: Backup Your Data
Before making any changes to your system, back up your important files. If you’re replacing an existing drive or planning to clone your operating system, ensure everything is safely stored on an external drive or cloud storage.
Step 2: Prepare Your System
-
Shut Down Your Computer: Turn off your PC or laptop and disconnect it from the power source.
-
Ground Yourself: Static electricity can damage sensitive components. Use an anti-static wrist strap or touch a grounded metal surface to discharge any static electricity.
Step 3: Open Your Computer
-
For Desktops: Unscrew the side panel of your case to access the internal components. Locate the drive bay where your SSD will be installed.
-
For Laptops: Flip your laptop over, and remove the screws securing the back panel. Refer to your laptop’s manual for specific instructions.
Step 4: Install the SATA SSD
-
Locate the Drive Bay: Find the 2.5-inch drive bay for your SSD. If your system doesn’t have a dedicated SSD mount, you might need a mounting bracket.
-
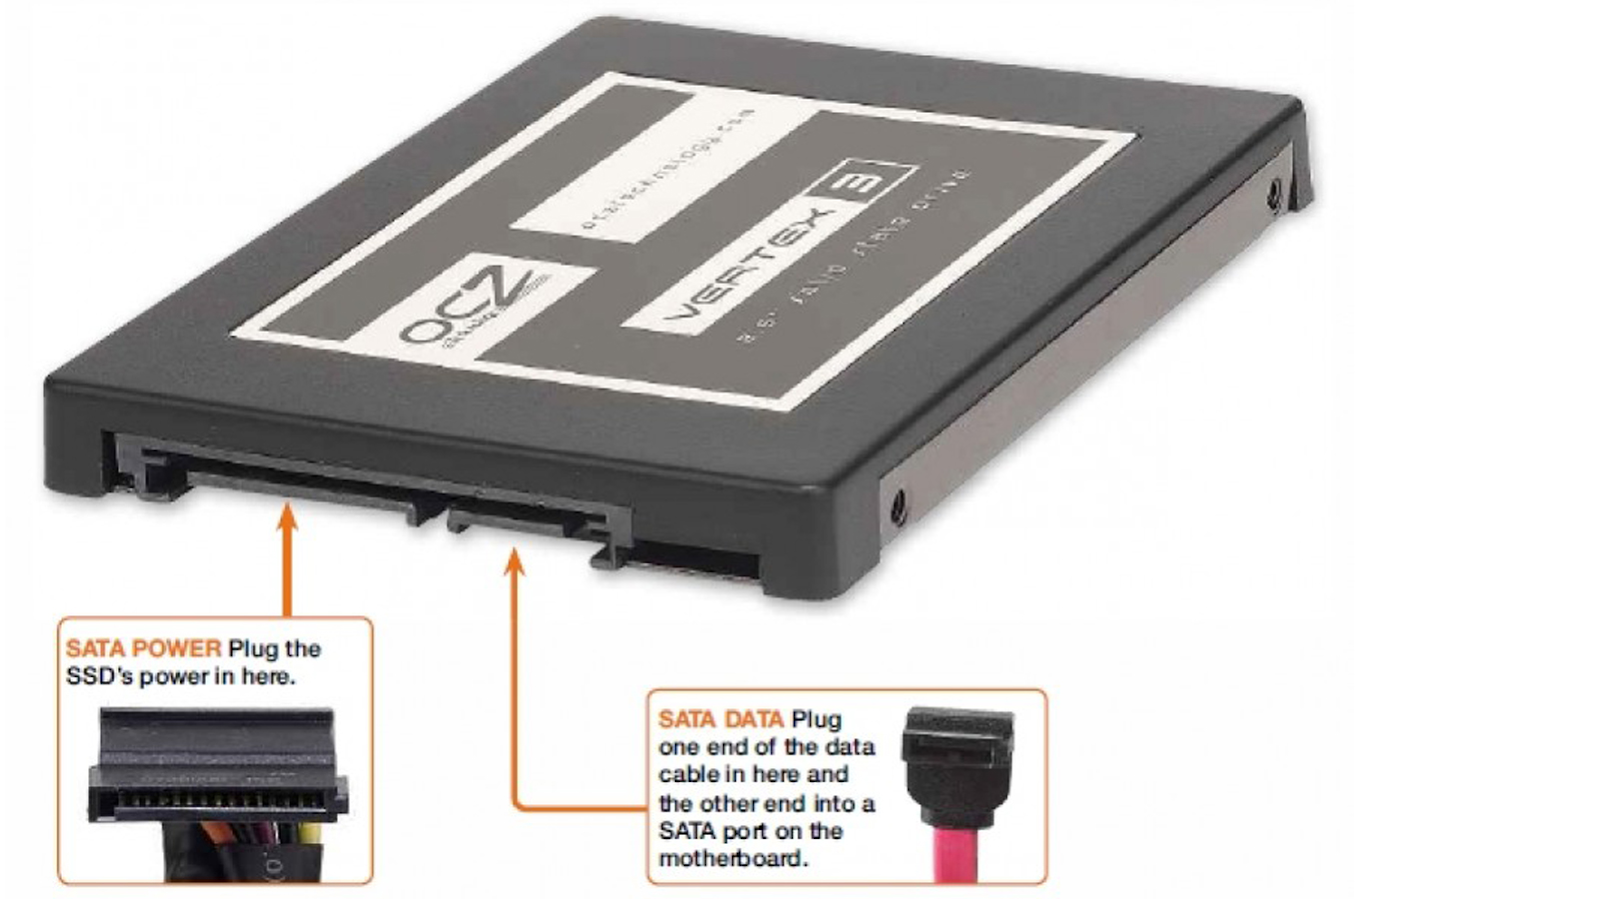
Connect the SATA Cable: Attach one end of the SATA cable to the SSD and the other to the motherboard’s SATA port.
-
Connect the Power Cable: Attach the power cable from your power supply to the SSD.
-
Secure the Drive: Use screws or a clip mechanism to firmly mount the SSD in place.
Step 5: Boot Up and Configure
-
Reassemble Your Computer: Replace the panels and screws, and reconnect your computer to power.
-
Enter BIOS/UEFI: Press the designated key (often F2, F10, or DEL) during startup to enter the BIOS/UEFI settings.
-
Check Drive Detection: Ensure your SATA SSD is detected under the storage or boot menu.
-
Set Boot Priority: If you’ve installed your operating system on the SSD, set it as the primary boot device.
Cloning Your Data or Installing the OS
Option 1: Cloning Your Existing Drive
If you want to transfer your operating system and files to the new SSD, you can clone your existing drive.
-
Download Cloning Software: Popular options include Macrium Reflect, EaseUS Todo Backup, and Acronis True Image.
-
Connect Both Drives: Use an external enclosure or USB-to-SATA adapter to connect the SSD to your system.
-
Start Cloning: Follow the software instructions to clone your current drive to the SSD.
Option 2: Fresh OS Installation
For a clean start, install a fresh copy of your operating system.
-
Create a Bootable USB: Use tools like the Windows Media Creation Tool or a Linux ISO file to create a bootable USB drive.
-
Install the OS: Boot from the USB and follow the on-screen instructions to install the operating system on your SSD.
Optimizing Your SATA SSD
Once your SATA SSD is up and running, optimize it for the best performance:
-
Enable AHCI Mode: This setting in the BIOS/UEFI ensures maximum speed and functionality for your SSD.
-
Disable Disk Defragmentation: Unlike HDDs, SSDs don’t require defragmentation. In fact, it can reduce their lifespan.
-
Enable TRIM: TRIM helps maintain the performance and longevity of your SSD by clearing unused data blocks.
Troubleshooting Tips
-
SSD Not Detected: Double-check your SATA and power connections. Ensure the drive is enabled in the BIOS.
-
Slow Performance: Verify that your motherboard supports the full speed of SATA III. Use a different SATA port if necessary.
-
Insufficient Space: Ensure you’ve chosen an SSD with adequate capacity for your needs.
SATA SSD Recommendations
If you’re looking for reliable SATA SSDs, here are some great options:
-
Samsung 870 EVO: Known for its speed, reliability, and long warranty period.
-
Crucial MX500: A budget-friendly option with excellent performance.
-
WD Blue 3D NAND: Offers a good balance of speed and price.
For high-quality SATA SSDs and accessories, check out ThinkRobotics for top-tier products and expert recommendations.
Conclusion
Upgrading to a SATA SSD is one of the easiest and most impactful ways to enhance your computer’s performance. With faster boot times, seamless multitasking, and improved reliability, you’ll feel like you’re using an entirely new system.
Whether you’re a seasoned DIY enthusiast or a first-time upgrader, this SATA SSD installation guide will ensure a smooth and successful process. So, go ahead and make the switch—you’ll thank yourself every time you power up your device!
Frequently Asked Questions
1. Can I install an operating system directly on a new SATA SSD?
Yes, you can install a fresh OS by creating a bootable USB drive and following the setup instructions.
2. What size SATA SSD should I choose for my system?
This depends on your storage needs. A 500GB SSD is a common starting point for most users.
3. What are the benefits of upgrading to a SATA SSD?
Faster boot times, quicker file access, silent operation, and improved system reliability.
4. How long does it take to install a SATA SSD?
Installation typically takes 30-60 minutes, including configuring the drive in BIOS.
5. Where can I buy reliable SATA SSDs?
You can purchase high-quality SATA SSDs and accessories at ThinkRobotics.