TinyML Gesture Recognition Tutorial: Building Smart Gesture-Controlled Devices

In recent years, the fusion of machine learning and embedded systems has given rise to TinyML. This technology enables the execution of machine learning models on ultra-low-power microcontrollers. One of the most exciting applications of TinyML is gesture recognition, which allows devices to interpret human hand or body movements and respond accordingly. This technology is transforming user interfaces in wearables, smart home devices, robotics, and more.
This tutorial will guide you through the fundamentals of TinyML gesture recognition, from understanding the technology to building your gesture-controlled device. Whether you’re a beginner or an experienced developer, this guide will help you harness the power of TinyML for gesture recognition.
What is TinyML?
TinyML stands for Tiny Machine Learning, which refers to the deployment of machine learning models on resource-constrained devices such as microcontrollers with limited memory and processing power. Unlike traditional ML that requires powerful CPUs or GPUs, TinyML enables AI inference directly on small, battery-powered devices, making it ideal for edge applications where latency, privacy, and power consumption are critical.
Why Gesture Recognition with TinyML?
Gesture recognition allows devices to understand and interpret human gestures, enabling intuitive and touchless control. When combined with TinyML, gesture recognition can be implemented on small, low-power devices, opening up possibilities such as:
-
Hands-free control of smart home appliances
-
Wearable devices that respond to hand movements
-
Robotics with natural human-robot interaction
-
Assistive technologies for people with disabilities
TinyML makes these applications feasible by running gesture recognition models locally, reducing reliance on cloud connectivity and improving responsiveness.
Components Needed for TinyML Gesture Recognition
To build a TinyML gesture recognition system, you will need:
-
Microcontroller board: Popular choices include Arduino Nano 33 BLE Sense, STM32, or ESP32.
-
Sensors: Accelerometers and gyroscopes (IMU sensors) to capture motion data.
-
Development environment: Arduino IDE, TensorFlow Lite for Microcontrollers, or Edge Impulse.
-
Gesture dataset: Pre-recorded sensor data representing different gestures.
-
Power source: Battery or USB power for your microcontroller.
Step 1: Collecting Gesture Data
The first step in building a gesture recognition system is collecting sensor data for the gestures you want to recognize. For example, you might want to detect gestures like swipe left, swipe right, circle, or tap.
Using the microcontroller’s onboard IMU sensor, record accelerometer and gyroscope data while performing each gesture multiple times. Label each data segment with the corresponding gesture name. This dataset will be used to train your machine learning model.
Step 2: Preprocessing Sensor Data
Raw sensor data can be noisy and inconsistent. Preprocessing steps include:
-
Filtering: Apply low-pass filters to remove high-frequency noise.
-
Segmentation: Divide continuous sensor data into fixed-length windows (e.g., 1-second intervals).
-
Normalization: Scale sensor values to a consistent range.
-
Feature extraction: Compute features like mean, variance, or frequency components, or use raw data directly for deep learning models.
Preprocessing improves model accuracy and robustness.
Step 3: Training the Gesture Recognition Model
You can train your model using platforms like TensorFlow or Edge Impulse. Edge Impulse is particularly beginner-friendly, offering tools to upload data, design models, and generate optimized code for microcontrollers.
Typical model architectures for gesture recognition include:
-
Convolutional Neural Networks (CNNs): Effective for spatial feature extraction.
-
Recurrent Neural Networks (RNNs) or LSTM: Capture temporal dependencies in time-series sensor data.
-
Hybrid models: Combine CNN and LSTM layers for improved performance.
Train your model on the labeled dataset, validate its accuracy, and fine-tune hyperparameters as needed.
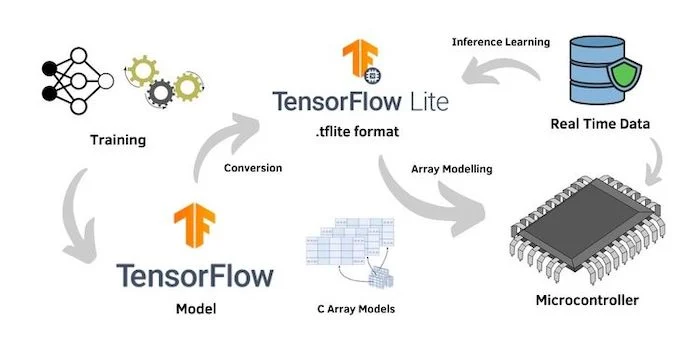
Step 4: Converting and Deploying the Model on a Microcontroller
Once trained, convert the model to TensorFlow Lite format optimized for microcontrollers. Use TensorFlow Lite for Microcontrollers or Edge Impulse’s deployment tools to generate C++ code that can be integrated into your microcontroller firmware.
Upload the model to your device and write code to:
-
Read real-time sensor data.
-
Run inference using the TinyML model.
-
Interpret the output to identify gestures.
-
Trigger actions based on recognized gestures (e.g., turn on a light, move a robot arm).
Step 5: Testing and Improving Your System
Test your gesture recognition system in real-world conditions. Evaluate its accuracy, latency, and power consumption. Collect additional data if certain gestures are misclassified and retrain the model to improve performance.
Consider implementing:
-
Thresholding: To reduce false positives.
-
Confidence scoring: To act only on high-confidence predictions.
-
Power management: To extend battery life during idle periods.
Practical Applications of TinyML Gesture Recognition
TinyML gesture recognition is already being used in various domains:
-
Smart Home: Control lights, fans, or music players with simple hand gestures.
-
Wearables: Fitness trackers that recognize workout gestures or hand signals.
-
Robotics: Robots that respond to human commands without voice or buttons.
-
Healthcare: Assistive devices for patients with limited mobility.
-
Gaming: Gesture-based controls for immersive experiences.
Challenges and Future Directions
While TinyML gesture recognition is promising, challenges remain:
-
Limited computational resources: Models must be small and efficient.
-
Sensor variability: Different devices may have varying sensor quality.
-
Environmental noise: Movements unrelated to gestures can cause false detections.
-
User variability: Different users perform gestures differently.
Future advancements in model compression, sensor fusion, and adaptive learning will enhance the accuracy and usability of TinyML gesture recognition systems.
Conclusion
TinyML gesture recognition combines the power of AI with the efficiency of microcontrollers to create smart, responsive devices that understand human gestures. By following this tutorial—from data collection to deployment, you can build your own gesture-controlled applications that operate locally, securely, and with minimal power consumption.
As TinyML technology evolves, gesture recognition will become even more accessible, enabling innovative solutions across industries and everyday life.
Frequently Asked Questions
1. What microcontrollers are best for TinyML gesture recognition?
Boards like Arduino Nano 33 BLE Sense, STM32, and ESP32 are popular due to their onboard sensors and processing capabilities.
2. Can I use pre-trained models for gesture recognition?
Yes, but custom training with your own gesture data usually yields better accuracy for specific applications.
3. How much power does a TinyML gesture recognition system consume?
Typically, these systems consume very low power, allowing battery operation for days or weeks depending on usage.
4. Is programming experience required to build TinyML projects?
Basic programming knowledge helps, but platforms like Edge Impulse simplify the process with graphical interfaces.
5. Can TinyML gesture recognition work in noisy environments?
With proper data preprocessing and model training, TinyML systems can be robust to noise, but extreme conditions may still affect accuracy.