The output voltage can be set to 5V/8V/9V/12V, the default is 12V
Output performance: Take 3.7V lithium battery input as an example, it can output 5V 1.2A, 8V 0.7A, 9V 0.6A, 12V 0.5A.Make sure that the input current and output current does not exceed 1.5A.
Voltage setting description
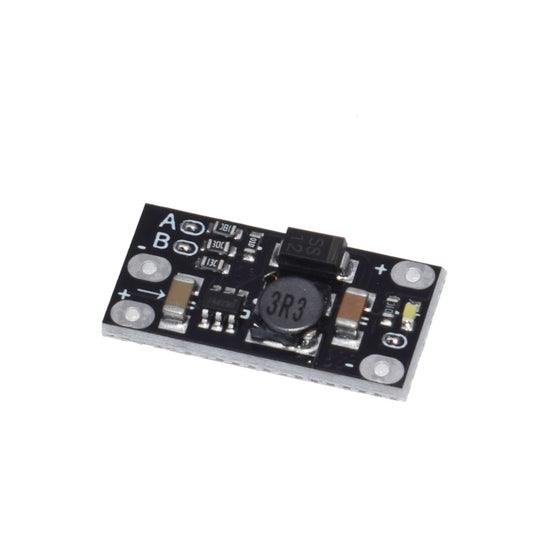
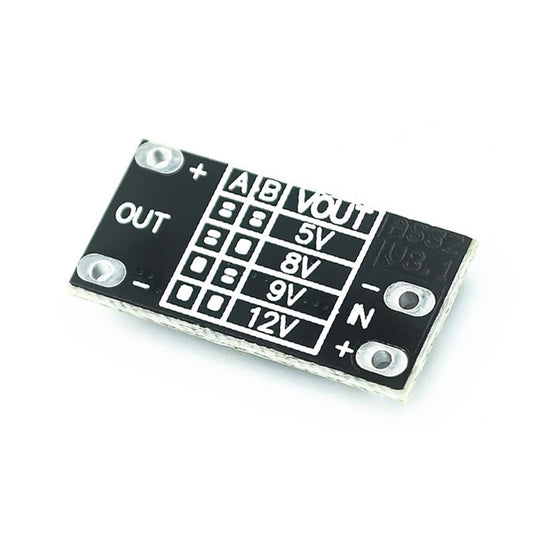
The front side of the PCB can be seen with the words A and B. The output voltage can be changed by using the soldering iron to change the pad on and off. In the following table, 0 means the pad is disconnected and 1 means the pad is connected.
A B VOUT 0 0 5V 0 1 8V 1 0 9V 1 1 12V
The pad next to the LED indicator can also be turned off to turn off the indicator.
This case got the best thermals for the RPi4; the power button is best for a safe and easy power off. Got it delivered with 2d; thanks for the quick delivery.
We have an opportunity for the requirement of JCG046L LTE Antenna. Kindly share your best quote and let us know the lead time.
Also please provide the test report. Specifically, they need details on Return Loss, VSWR, and Average Efficiency for all 4G bands supported by the antenna.
{"id":6630510592086,"title":"1.5A Multi-function Mini Boost Step Up Module","handle":"1-5a-multi-function-mini-boost-step-up-module","description":"\u003cul\u003e\n\u003cli\u003eInput voltage range: 2.5V~VOUT-0.5V\u003c\/li\u003e\n\u003cli\u003eThe output voltage can be set to 5V\/8V\/9V\/12V, the default is 12V\u003c\/li\u003e\n\u003cli\u003e\n\u003cspan data-mce-fragment=\"1\"\u003eOutput performance: Take 3.7V lithium battery input as an example, it can output 5V 1.2A, 8V 0.7A, 9V 0.6A, 12V 0.5A.\u003c\/span\u003e\u003cspan data-mce-fragment=\"1\"\u003e \u003c\/span\u003e\u003cspan data-mce-fragment=\"1\"\u003eMake sure that the input current and output current does not exceed 1.5A.\u003c\/span\u003e\n\u003c\/li\u003e\n\u003c\/ul\u003e\n\u003ch3\u003e\n\u003cbr data-mce-fragment=\"1\"\u003e\u003cspan data-mce-fragment=\"1\"\u003eVoltage setting description\u003c\/span\u003e\n\u003c\/h3\u003e\n\u003cp\u003e\u003cspan data-mce-fragment=\"1\"\u003eThe front side of the PCB can be seen with the words A and B. The output voltage can be changed by using the soldering iron to change the pad on and off. In the following table, 0 means the pad is disconnected and 1 means the pad is connected.\u003c\/span\u003e\u003cbr data-mce-fragment=\"1\"\u003e\u003cbr data-mce-fragment=\"1\"\u003e\u003cspan data-mce-fragment=\"1\"\u003eA B VOUT\u003c\/span\u003e\u003cbr data-mce-fragment=\"1\"\u003e\u003cspan data-mce-fragment=\"1\"\u003e0 0 5V\u003c\/span\u003e\u003cbr data-mce-fragment=\"1\"\u003e\u003cspan data-mce-fragment=\"1\"\u003e0 1 8V\u003c\/span\u003e\u003cbr data-mce-fragment=\"1\"\u003e\u003cspan data-mce-fragment=\"1\"\u003e1 0 9V\u003c\/span\u003e\u003cbr data-mce-fragment=\"1\"\u003e\u003cspan data-mce-fragment=\"1\"\u003e1 1 12V\u003c\/span\u003e\u003cbr data-mce-fragment=\"1\"\u003e\u003cbr data-mce-fragment=\"1\"\u003e\u003cbr data-mce-fragment=\"1\"\u003e\u003cspan data-mce-fragment=\"1\"\u003eThe pad next to the LED indicator can also be turned off to turn off the indicator.\u003c\/span\u003e\u003cbr data-mce-fragment=\"1\"\u003e\u003cspan data-mce-fragment=\"1\"\u003e\u003c\/span\u003e\u003c\/p\u003e\n\u003cp\u003e\u003cspan data-mce-fragment=\"1\"\u003e\u003cstrong\u003eProduct size\u003c\/strong\u003e: 22mm × 11mm × 3.6mm\u003c\/span\u003e\u003c\/p\u003e","published_at":"2022-12-06T11:09:14+05:30","created_at":"2021-09-15T23:43:06+05:30","vendor":"ThinkRobotics","type":"Power","tags":["1.5A","12v","5v","8v","9v","boost module","ELC5","LIPO boost module","power module","POWER-MOD","step up module","USB-TESTER","ZOHO UPDATED"],"price":4999,"price_min":4999,"price_max":4999,"available":false,"price_varies":false,"compare_at_price":7999,"compare_at_price_min":7999,"compare_at_price_max":7999,"compare_at_price_varies":false,"variants":[{"id":39541042937942,"title":"Default Title","option1":"Default Title","option2":null,"option3":null,"sku":"ELC5058","requires_shipping":true,"taxable":true,"featured_image":null,"available":false,"name":"1.5A Multi-function Mini Boost Step Up Module","public_title":null,"options":["Default Title"],"price":4999,"weight":20,"compare_at_price":7999,"inventory_management":"shopify","barcode":"ELC5058","requires_selling_plan":false,"selling_plan_allocations":[],"quantity_rule":{"min":1,"max":null,"increment":1}}],"images":["\/\/thinkrobotics.com\/cdn\/shop\/products\/8bb5257de6695874f829b84a14bfaf52.jpg?v=1631729858","\/\/thinkrobotics.com\/cdn\/shop\/products\/3bfdf27ec56e00067a7df5a983ae7c2e.jpg?v=1631729858"],"featured_image":"\/\/thinkrobotics.com\/cdn\/shop\/products\/8bb5257de6695874f829b84a14bfaf52.jpg?v=1631729858","options":["Title"],"media":[{"alt":"1.5A Multi-function Mini Boost Step Up Module","id":21291954470998,"position":1,"preview_image":{"aspect_ratio":1.0,"height":983,"width":983,"src":"\/\/thinkrobotics.com\/cdn\/shop\/products\/8bb5257de6695874f829b84a14bfaf52.jpg?v=1631729858"},"aspect_ratio":1.0,"height":983,"media_type":"image","src":"\/\/thinkrobotics.com\/cdn\/shop\/products\/8bb5257de6695874f829b84a14bfaf52.jpg?v=1631729858","width":983},{"alt":"1.5A Multi-function Mini Boost Step Up Module","id":21291954438230,"position":2,"preview_image":{"aspect_ratio":1.0,"height":800,"width":800,"src":"\/\/thinkrobotics.com\/cdn\/shop\/products\/3bfdf27ec56e00067a7df5a983ae7c2e.jpg?v=1631729858"},"aspect_ratio":1.0,"height":800,"media_type":"image","src":"\/\/thinkrobotics.com\/cdn\/shop\/products\/3bfdf27ec56e00067a7df5a983ae7c2e.jpg?v=1631729858","width":800}],"requires_selling_plan":false,"selling_plan_groups":[],"content":"\u003cul\u003e\n\u003cli\u003eInput voltage range: 2.5V~VOUT-0.5V\u003c\/li\u003e\n\u003cli\u003eThe output voltage can be set to 5V\/8V\/9V\/12V, the default is 12V\u003c\/li\u003e\n\u003cli\u003e\n\u003cspan data-mce-fragment=\"1\"\u003eOutput performance: Take 3.7V lithium battery input as an example, it can output 5V 1.2A, 8V 0.7A, 9V 0.6A, 12V 0.5A.\u003c\/span\u003e\u003cspan data-mce-fragment=\"1\"\u003e \u003c\/span\u003e\u003cspan data-mce-fragment=\"1\"\u003eMake sure that the input current and output current does not exceed 1.5A.\u003c\/span\u003e\n\u003c\/li\u003e\n\u003c\/ul\u003e\n\u003ch3\u003e\n\u003cbr data-mce-fragment=\"1\"\u003e\u003cspan data-mce-fragment=\"1\"\u003eVoltage setting description\u003c\/span\u003e\n\u003c\/h3\u003e\n\u003cp\u003e\u003cspan data-mce-fragment=\"1\"\u003eThe front side of the PCB can be seen with the words A and B. The output voltage can be changed by using the soldering iron to change the pad on and off. In the following table, 0 means the pad is disconnected and 1 means the pad is connected.\u003c\/span\u003e\u003cbr data-mce-fragment=\"1\"\u003e\u003cbr data-mce-fragment=\"1\"\u003e\u003cspan data-mce-fragment=\"1\"\u003eA B VOUT\u003c\/span\u003e\u003cbr data-mce-fragment=\"1\"\u003e\u003cspan data-mce-fragment=\"1\"\u003e0 0 5V\u003c\/span\u003e\u003cbr data-mce-fragment=\"1\"\u003e\u003cspan data-mce-fragment=\"1\"\u003e0 1 8V\u003c\/span\u003e\u003cbr data-mce-fragment=\"1\"\u003e\u003cspan data-mce-fragment=\"1\"\u003e1 0 9V\u003c\/span\u003e\u003cbr data-mce-fragment=\"1\"\u003e\u003cspan data-mce-fragment=\"1\"\u003e1 1 12V\u003c\/span\u003e\u003cbr data-mce-fragment=\"1\"\u003e\u003cbr data-mce-fragment=\"1\"\u003e\u003cbr data-mce-fragment=\"1\"\u003e\u003cspan data-mce-fragment=\"1\"\u003eThe pad next to the LED indicator can also be turned off to turn off the indicator.\u003c\/span\u003e\u003cbr data-mce-fragment=\"1\"\u003e\u003cspan data-mce-fragment=\"1\"\u003e\u003c\/span\u003e\u003c\/p\u003e\n\u003cp\u003e\u003cspan data-mce-fragment=\"1\"\u003e\u003cstrong\u003eProduct size\u003c\/strong\u003e: 22mm × 11mm × 3.6mm\u003c\/span\u003e\u003c\/p\u003e"}