


Welcome to the discussion thread for ATMEL AT AVR ISP MKII XPII USB STK500 COMPATIBLE PROGRAMMER
Feel free to ask questions, share tips or report issues.
Feel free to ask questions, share tips or report issues.
Instructions:
Same as AT AVR ISP:
Refer to AVRStudio 4.18 SP3, the following devices are supported:
| Classic | Tiny* | Mega* | Other |
|---|---|---|---|
| AT90S1200 AT90S2313 AT90S/LS2323 AT90S/LS2343 AT90S/LS2333 AT90S4414 AT90S/LS4433 AT90S/LS4434 AT90S8515 AT90S/LS8535 |
ATtiny12 ATtiny13 ATtiny15 ATtiny22 ATtiny2313 ATtiny24 ATtiny25 ATtiny26 ATtiny44 ATtiny45 ATtiny461 ATtiny84 ATtiny85 ATtiny861 |
ATmega48 ATmega48P ATmega8 ATmega88 ATmega88P ATmega8515 ATmega8535 ATmega16 ATmega162 ATmeg164P ATmega165 ATmega165P ATmega168 ATmega168P ATmega169 ATmega169P ATmega32 ATmega324 ATmega324P ATmega325 ATmega325P ATmega3250 ATmega3250P ATmega329 ATmega329P ATmega3290 ATmega3290P ATmega64 ATmega640 ATmega644P ATmega645 ATmega6450 ATmega649 ATmega6490 ATmega128 ATmega1280 ATmega1281 ATmega2560 ATmega2561 |
AT86RF401 AT89S51 AT89S52 AT90PWM2 AT90PWM2B AT90PWM3 AT90PWM3B AT90CAN32 AT90CAN64 AT90CAN128 AT90USB162 AT90USB646 AT90USB647 AT90USB1286 AT90USB1287 |
| *Supports all low voltage versions of the devices with suffix of L/V, such as ATmega16L, ATmega48V | |||
Note: the COM port should be configured as COM1-COM4 for the first time, refer to the user manual for more details.
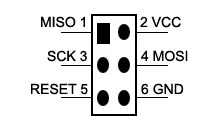
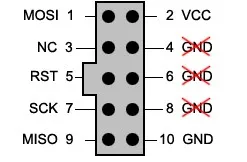
The USB AVRISP CH connects to the target board through 3 optional cables. Depending on the existed connector on the target board, the cable has to be changed accordingly.
Note: the programmer is powered from USB connection, however, it will not power the target board, which should be powered from another supply.
Package Content:
No reviews yet. Be the first to share your experience!
Category: View all Arduino
Fill out the form below and our team will get back to you with bulk pricing.
Instructions:
Same as AT AVR ISP:
Refer to AVRStudio 4.18 SP3, the following devices are supported:
| Classic | Tiny* | Mega* | Other |
|---|---|---|---|
| AT90S1200 AT90S2313 AT90S/LS2323 AT90S/LS2343 AT90S/LS2333 AT90S4414 AT90S/LS4433 AT90S/LS4434 AT90S8515 AT90S/LS8535 |
ATtiny12 ATtiny13 ATtiny15 ATtiny22 ATtiny2313 ATtiny24 ATtiny25 ATtiny26 ATtiny44 ATtiny45 ATtiny461 ATtiny84 ATtiny85 ATtiny861 |
ATmega48 ATmega48P ATmega8 ATmega88 ATmega88P ATmega8515 ATmega8535 ATmega16 ATmega162 ATmeg164P ATmega165 ATmega165P ATmega168 ATmega168P ATmega169 ATmega169P ATmega32 ATmega324 ATmega324P ATmega325 ATmega325P ATmega3250 ATmega3250P ATmega329 ATmega329P ATmega3290 ATmega3290P ATmega64 ATmega640 ATmega644P ATmega645 ATmega6450 ATmega649 ATmega6490 ATmega128 ATmega1280 ATmega1281 ATmega2560 ATmega2561 |
AT86RF401 AT89S51 AT89S52 AT90PWM2 AT90PWM2B AT90PWM3 AT90PWM3B AT90CAN32 AT90CAN64 AT90CAN128 AT90USB162 AT90USB646 AT90USB647 AT90USB1286 AT90USB1287 |
| *Supports all low voltage versions of the devices with suffix of L/V, such as ATmega16L, ATmega48V | |||
Note: the COM port should be configured as COM1-COM4 for the first time, refer to the user manual for more details.
The USB AVRISP CH connects to the target board through 3 optional cables. Depending on the existed connector on the target board, the cable has to be changed accordingly.
Note: the programmer is powered from USB connection, however, it will not power the target board, which should be powered from another supply.
Package Content:
No reviews yet. Be the first to share your experience!
Category: View all Arduino
Fill out the form below and our team will get back to you with bulk pricing.
Custom Requirements?
Related products


